Magnetism Guide
The Magnetism Guide below is designed to coordinate with the ScienceWiz™ Magnetism Teacher’s Pack which includes a book and materials for each student in the class, as well as the Magnetism Workbook, which is sold separately.
Student Online Courseware Materials are also available.
Student interactive materials and assessments are provided in two forms:
1) One set of materials are set up for group sharing and discussions at the front of the class. You can present these materials using this guide. This Teacher’s Guide includes a highlighting capability which converts the selected text into speech. Highlight text to speak. Double click outside the text anywhere on the window background to stop the speech-to-text feature.
2) The second set of materials is available inside each student’s courseware account for them to explore and complete individually. The instructor will need to enter or bulk load the students’ names and email (or parents’) accounts to make use of this online courseware component. The online student courseware offers auto-grading and auto-record keeping.
Each student account also includes:
- a highlighting capability which converts the selected text into speech.
- an individual note-taking capability.
Your feedback is greatly appreciated. Please let us know what you like and what you would like to see changed or improved (pan@sciencewiz.com).
Module 1: Magnetism

The first module explores the topic of magnetism.
This module consists of eight separate 30 – 40 minute lessons.
To prepare for the first module, read and study pages 1-33 in the ScienceWiz™ Magnetism Book.
Module 1 – Lesson 1: Introduction to Magnetism (pgs 1-6)
Lesson 1: What sticks to magnets?
Before you begin, introduce Electra.
Click on the E or Electra, for a brief introduction.
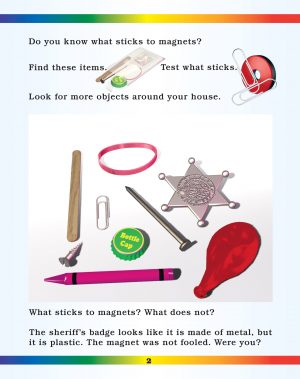
Collect classroom materials that do and don’t stick to magnets, such as crayons, paper clips, paper fasteners, coins (copper pennies and nickels).
Bring in household items such as dinnerware, pots and cans.
Hand out a ring magnet (The large bar magnet is too strong.), a Magnetism book and the encapsulated iron filings.
Have the students: read aloud page 1 in the book and put hair on Hairless Harry.
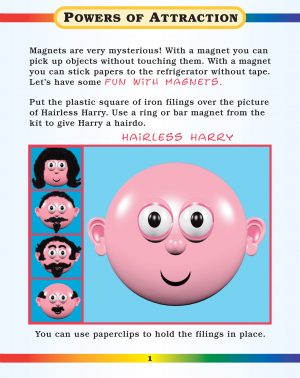
This activity most appropriate for a class of younger children.
ASK: Who has the most original hairdo?
Who has the silliest?
Who has made the handsomest creation?
Praise everyone, so they are motivated to participate.
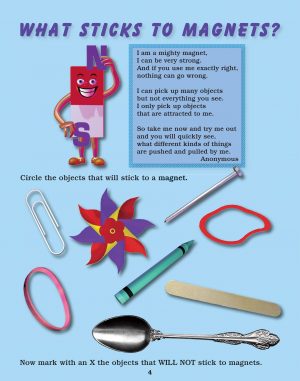
Hand out the bag of test items shown below and one ring magnet and the book on magnetism. Include the common items such as crayons and balloons, that are also shown on page two.
Project page 2 below onto the front whiteboard or TV monitor.
(Clicking on the image will cause it to enlarge into a slide.)
Have students turn to page 2 in the Magnetism Book.
Have students test which of these items stick to the rink magnet.
Ask the class: Do ALL metals stick to magnets?
Will a penny or a nickel stick to a magnet.
How about a bottle cap?
List the answers on the board.
How can they test this question?
Hand out the items shown: pennies, nickels, etc.
Have students test their theories by doing
the experiments on page 3.
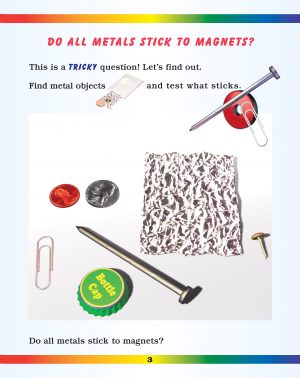
Make a list of the results.
Discuss the results and help students draw their own conclusions.
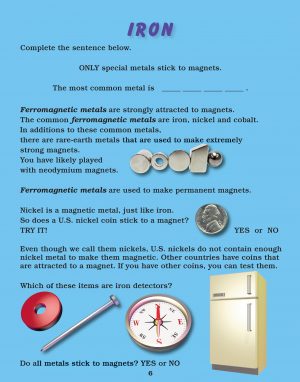
Use page 33 as a reference to identify the metals in common materials.
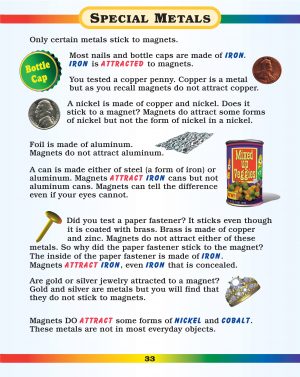
It is important that students to learn the names of the following common metals: iron (and steel), aluminum, tin, nickel, cobalt, zinc, silver, gold, platinum. These are elements in Periodic Table. In fact, most of the elements in the Periodic Table are metals. Knowing the names and properties of metals is a precursor to learning basic Chemistry.
Use the names of common metals throughout this class:
Here is the basic conclusion:
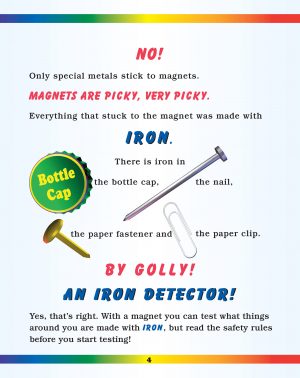
ALL metals conduct electricity but only SPECIAL metals stick to magnets.
Project this page four onto the front screen.
Read it aloud to reinforce this conclusion.
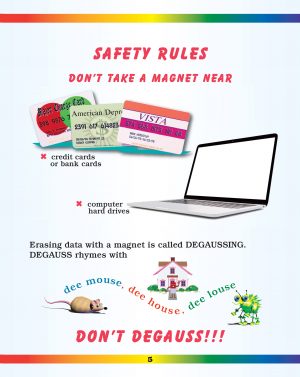
Read the safety rules about using magnets and sensitive items (page 5).
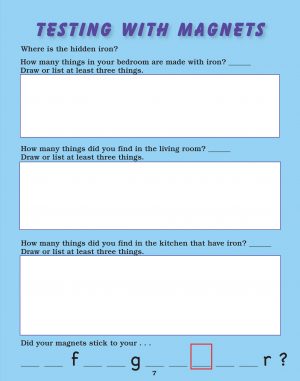
Have student test to see if the metal objects around the classroom are made with either iron or steel (page 6).
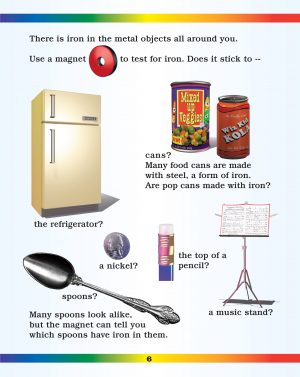
List which objects in the classroom contain the metal iron (Fe).
Put these key words on a chart: iron, cobalt, nickel, attraction, magnetism, metals.
Class Assignment: In class, in at least 1-2 days after doing lesson one, have your students complete pages 4-5 in their Magnetism Workbook.

Project, discuss and go over page 6.
Assign page 7 as a homework assignment. This is also available in the courseware, so that students can turn the answers in directly online
or you can work with them in class to practice printing and spelling skills.
Module 1 – Lesson 2: Attraction & Repulsions (pgs 7-10)
Review: Have students tell you what they did last time. Hold up familiar metal object such as coins, paperclips, paper fasteners and aluminum foil.
- Have students name the common metals in each item.
- Ask whether that metal object will stick to a magnet.
- Test their recall with an actual magnet.
Lesson 2: Rules of Magnetic Attraction and Repulsion
Collect and bring to class: SMALL paper clips and paper fasteners.
Optional: bring in a train set that uses magnetic attraction to couple cars. At the end of the class, have students explain how these trains were designed.
Have the students: do the experiment on page 8.
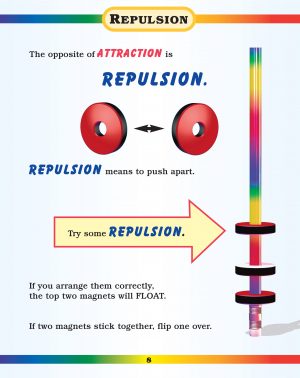
Have them discover which sides of the color coded ring magnets attract. Have them discover which sides of the ring magnets repel.

Have them discover for themselves the rules for magnetic attraction and
repulsion (page 10).
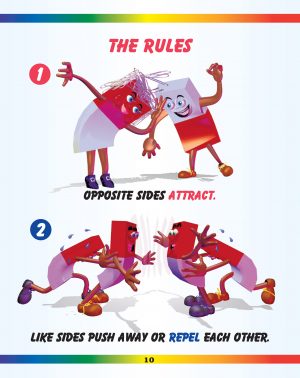
Derive these rules through observation.
Write them on the board.
EXTENSION: Have students work in pairs to extend their observations on page 8 by adding together 4 or more ring magnets onto one pencil. How do the magnets stack? Are the magnets on the bottom closer together than the ones on top? How does the distance between ring magnets change as you add more rings to the stack? What pattern of forces explains this?
(HINT: Which magnet(s) experience the most force in one direction from
the other magnets. Which magnet is free to move farthest upward and
which of these magnets is constrained by forces from below? Key cross cutting concept: It is always the SUM of the forces on any one object.)
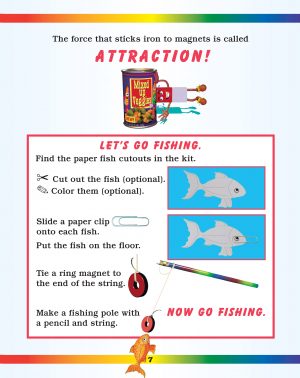
Have students end the class with the “Let’s Go Fishing” activity (page 7).
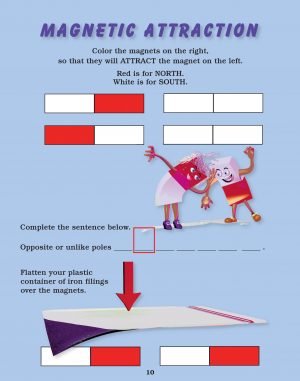
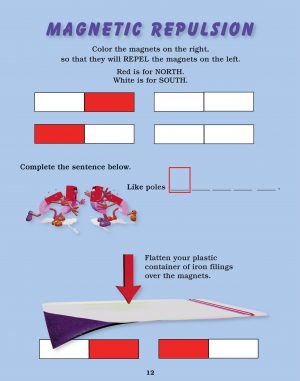
Add the magnetism vocabulary words to the chart: attraction, repulsion. Add the the list: Unlike poles attract. Like poles repel.
Class Assignment: Have your students complete
Module 1 – Lesson 3: Magnetic Poles to Temporary Magnets (pgs 11-16)
Review: Have the students repeat the names of common metals, recall which will stick to magnets. Ask them to show and explain the rules of magnetic attraction and repulsion.
Show the very short animations on key concepts:
Lesson 3: Learn about north and south poles. Make a Temporary Magnet
Collect and bring to class: Small paper clips, paper plates, plastic cup, card stock or cardboard, spoons
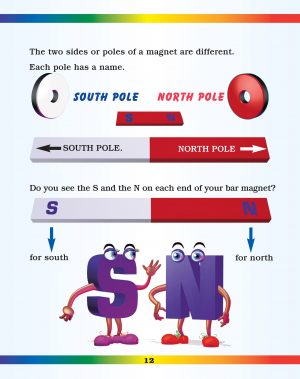
Have the students: look at the magnets and to name the magnetic poles.
Read aloud page 11 and 12.

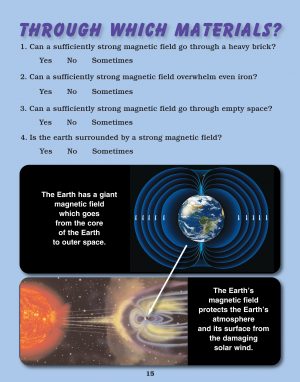
Ask students to predict which materials a magnetic force will go through?
Water? Rock? Cardboard?
Do the experiments of page 13-14 to test their guesses.


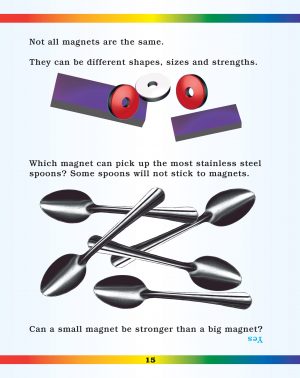
Magnets can be different shapes, sizes and strengths.
Test the strength of each magnets as shown on page 15.
You can use anything from paper clips, to staples, to spoons
to quantify and compare the strength of each magnet.
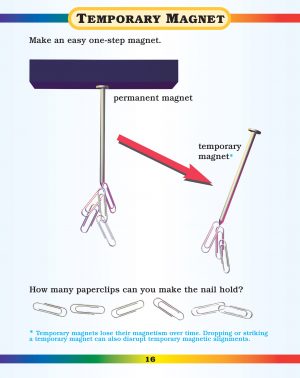
Make a temporary magnet as shown on page 16.
Add the key words on a chart: magnetic poles, north, south, temporary magnet.
Class Assignment: Have your students complete
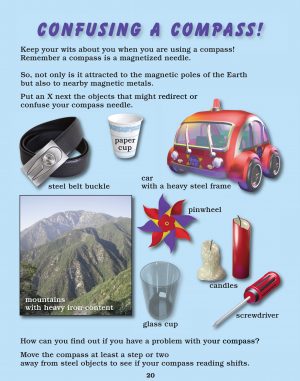
Module 1 – Lesson 4: Compasses & Lines of Force (pgs 17-21)
Review: Have students recall what they did in class last time and what they concluded. Review the vocabulary words.
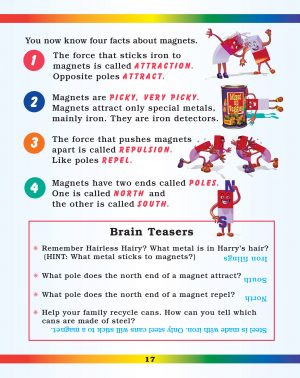
Use page 17 to summarize what they have learned so far, as listed.
Discuss the four questions at the bottom of page 17.
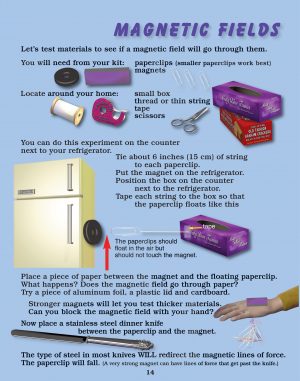
Lesson 4: Compasses and Lines of force. Use iron filing to visualize the magnetic field that surrounds a magnet.
Collect and bring to class: Small hammers, small bags and extra ceramic magnets to break
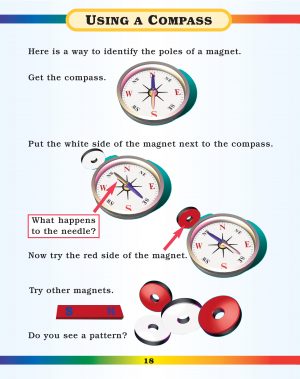
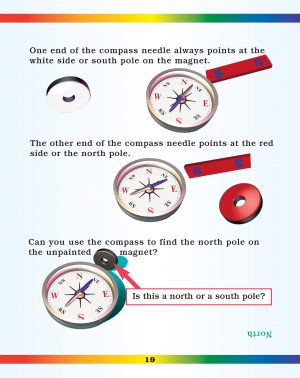
Hand out a set of each of the following to each student: a compass, a red and white ring magnet, a plain ring magnet, a N/S bar magnet and the book.
Have the students use their compasses to identify the poles on the various magnets both color coded and not (page 18 – 19).
Use the hammer and extra ring magnets to perform the experiments on page 20.
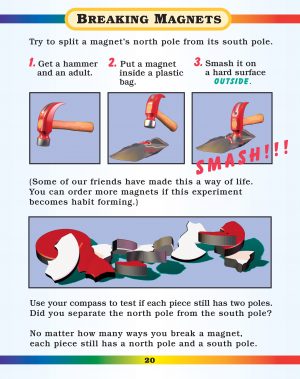
Do the ring magnets ever go back together again?
Does each broken piece have both a north and south pole?
Test it with the compass.
No one has ever found a magnetic monopole — a magnet with only ONE pole. All magnets appear to two poles: a North and a South pole. It would change our knowledge of physics if they did!
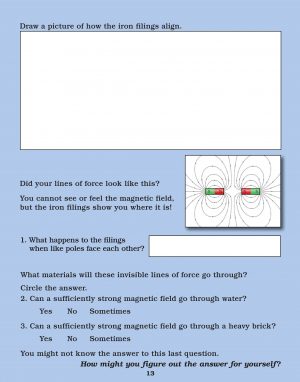
Explore lines of force (page 21).
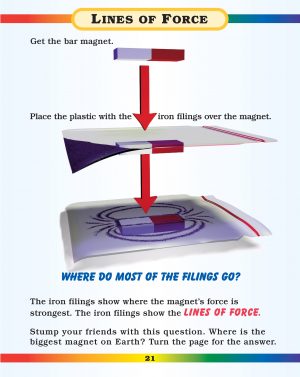
Add the key words on a chart: compass, magnetic monopole, lines of force, magnetic field
Show the videos:
- Magnetism: Lines of Force and Iron Filings (2min 30sec)
- Magnetism: Magnetic Lines of Force Demonstration (1min 11sec)
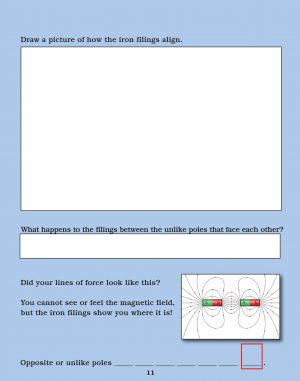
Class Assignment: Have your students complete these workbook pages.
The first page has its own slide for emphasis.
Be SURE to communicate that magnetic lines of force actually form closed loops as discussed and shown at the bottom of the page.
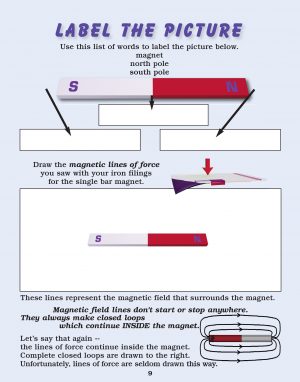
Complete the following pages with your students.
It helps to demonstrate this directly with loose iron filings. Place a piece of paper over the magnet and sprinkled on the iron filings to clearly demonstrate this to students in class. Alternatively, use the online videos.
Module 1 – Lesson 5: Compasses & Earth’s Magnetic Field (pgs 22-26)
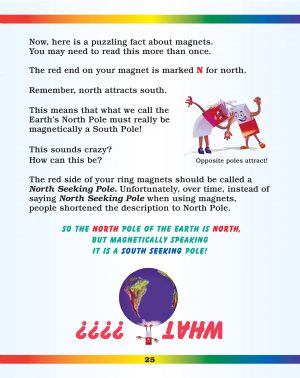
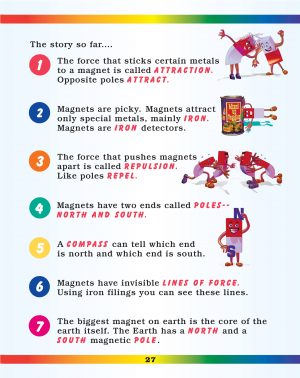
Review: Have students in the class tell you what they did in the last two classes and what vocabulary words they learned. After they discuss the rules of magnetic attraction and repulsion, have them recall that all magnets have two poles, a north and a south pole.
Ask: Have scientists been able to separate the north from the south pole of any magnet no matter how small? Not YET.
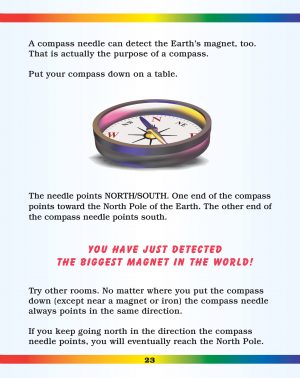
Lesson 5: Compasses and the Earth’s Magnetic Field. Learn to identify the magnetic poles of a Earth and navigate using a compass.
Collect and bring to class: city map, liquid soap, plastic cups or bowls
Read aloud and discuss pages 22-25.
Hand out the red/white ring magnet, a string and a book to each student.
Use a ring magnet and string to detect the Earths magnetic field, as shown.
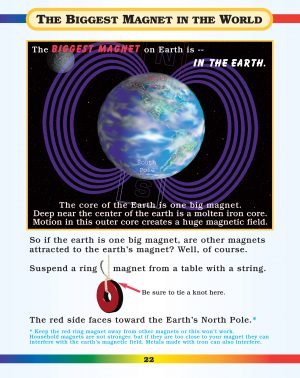
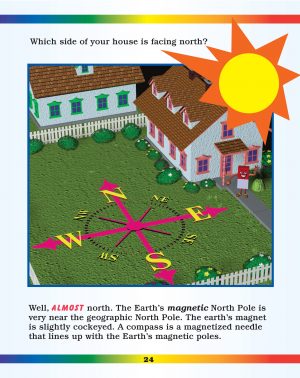
Students have just used a magnet to detect the Earth’s magnetic field. In fact, it caused the red magnet to turn northward. The source of that magnetic field is about 1800 miles (2890 km) below, in the core of the Earth. That force has traveled a great distance — through both solid and molten rock! Action at a distance, indeed!
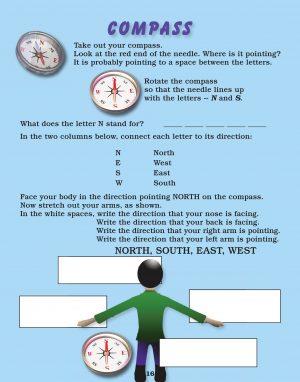
Hand out a compass to each student.
Project page 23 on the screen.
Have students open to page 23 in the book.
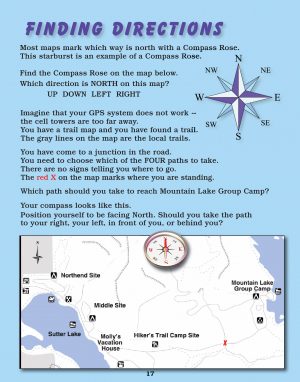
a) determine the position of the classroom windows relative to the earth’s magnetic poles and
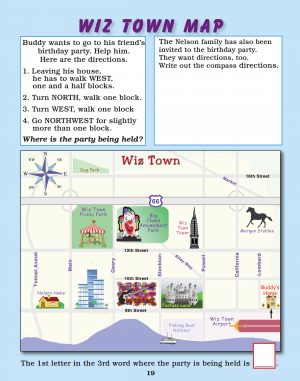
b) to explore a local map or
c) setup and solve a treasure hunt.
Show: the videos on www.sciencewiz.com, Portal to Discovery.
Magnetism — More Explorations:
“Magnetic Poles of the earth; Shifting Magnetic Poles of the Earth”
Hand out the large ceramic magnet, the nail, the piece of foam and a cup of water.
Have students make the compass, as shown on page 26.

Show the video: Making a Compass (1min 22 sec).
Add the key words on a chart: earth’s magnetic poles
Class Assignment: Have your students which side of their home or apartment is facing north?
Answer these questions with your students in class.


Then have them use their online courseware to review and then answer individually, similar questions.
Module 1 – Lesson 6: Making an Electromagnet (pgs 27-29)
Review: Read aloud and discuss page 27.
Lesson 6: Making an electromagnet. Students learn how to make a magnet using the moving electrons (electrical current) in a wire that is connected to a battery. The key concept here is that the electrons HAVE to be MOVING in the wire, in order to create a magnetic field.
Collect: D-cell batteries — 1 per student, small paper clips, rulers
Have students recall how they made a temporary magnet last time.
Hand out a battery, battery band, sand paper, a nail, magnet wire.
Explain to them that this time they will be making a magnet with electricity.
Use pages 28-29 to build their own electromagnets.
Have students work in groups of four.
Each will make their own electromagnet,
but they will vary the number of turns in the coil:
- 10 turns
- 20 turns,
- 40 turns
- 80 turns.
Use SMALL paper clips to determine the strength of each electromagnet.
Advise students to disconnect the batteries from the coil quickly.
DO NOT LEAVE THEM CONNECTED.
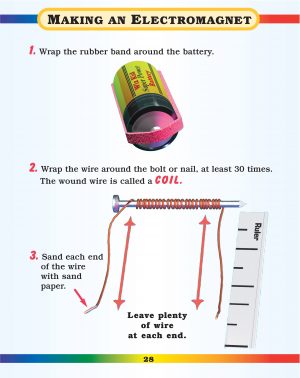
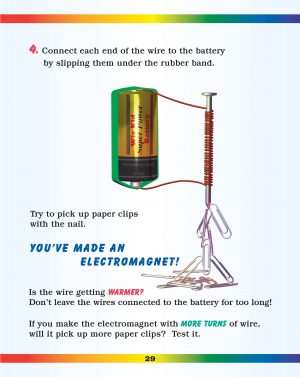
Chart the classroom results on the board.
Did more turns increases the strength of their electromagnets?
Notice that the electromagnets tend to weaken the batteries fairly quickly and that the electromagnets can get quite hot.
Show the “Don’t Short Out the Battery Video” on the Electricity Portal
to understand why. The wires heat, because the electromagnet is essentially shorting out the battery. Don’t leave the electromagnets connected for too long, as it is draining the battery very quickly. For the results to be consistent, everyone should take the data with new batteries!
Show this video: How can electricity create a magnet? (5 minutes)
Add the key words on a chart: coil, electromagnet
Class Assignment: Have your students complete
Module 1 – Lesson 7: Characteristics of Electromagnets (pgs 30-32)
Review: Have students in the class tell you what they did in the last two classes and what vocabulary words they learned. Ask them how they made a temporary magnetic.
Review what they have discovered so far about electromagnets.
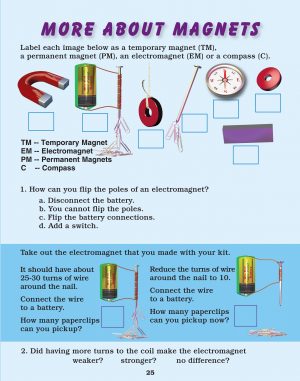
Lesson 7: Investigate the Characteristics of an Electromagnet. Learn how to flip the poles of an electromagnet and how to turn it on and off.
Collect and bring to class: D-cell batteries — 1 per student, small paper clips.
Ask students if they think that an electromagnet has a north and south pole like a permanent magnet does? How would they test this question?
Have students follow the directions on pages 30 to flip the poles on their own electromagnets. Use the compass and record the changes and share the results.
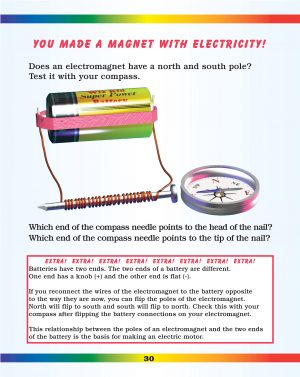
(Be sure that there is NO confusion between magnetic poles and
the PLUS and MINUS ends of a battery.)
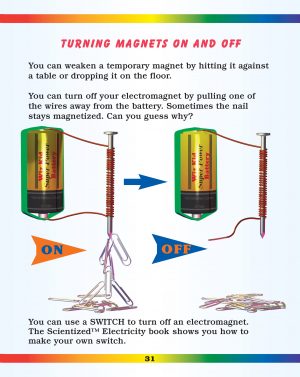
Use SMALL paper clips to determine the strength of the electromagnet and to observe how quickly the electromagnet can be shut on and off, as shown on page 31.
Read aloud page 32.

Go over this KEY concept, as it is an extremely important idea that has huge ramifications throughout science. It is one of those cross-cutting ideas.
MOVING charged particles create a magnetic field!
In fact, the moving electrons in a coil of wire can create HUGE magnetic fields, indeed! SO HUGE, that you can lift tonnage sized vehicles with it!
Show these more complete and explanatory videos on magnetism:
Magnetism: A Brief Introduction (6min 22sec)
Magnetism: What is Magnetism? (9min – be sure to show the first part on electro magnets. VERY clear explanation.)
Class Assignment: Have your students complete the following questions.
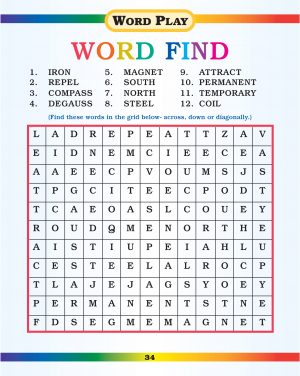
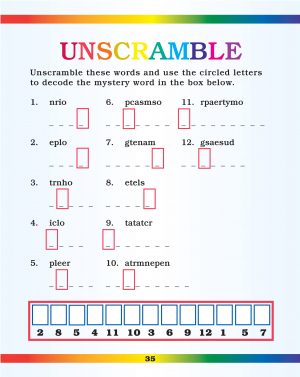
Assign or do word play at the end of the book on pages 34-35.
Module 2: Magnetism Extensions

Module 2 – Lesson 1: Through Materials & Vocabulary Development
To Review: The teacher should hold up materials from kits and systematically ask about the key concepts in the book with objects in hand.
Have the students TELL YOU about their observations throughout the class.
Lesson 1: More on through materials.
Use the link below to find out what children in England learn about magnetism. Read it together out loud.

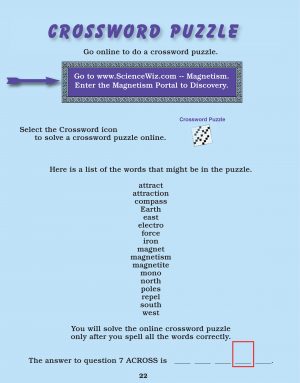
Class Assignment: Complete the online crossword puzzle. Here is a list of the words used in the crossword puzzle. You will only solve the puzzle when ALL the words are spelled correctly!
Module 2 – Lesson 2: Review questions
Go over this quiz either at the front of the class or online using this link.
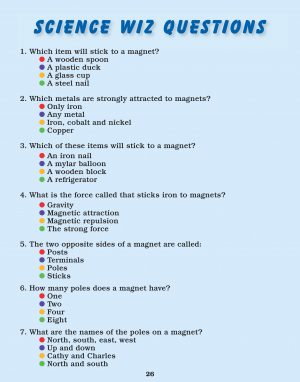

Class Assignment: Complete the courseware online assessment.
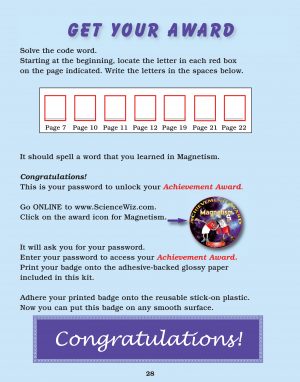
Module 2 – Lesson 3: Magnet Mazes and Achievement awards.


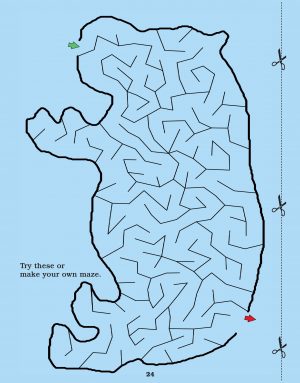
Have your students decode the secret password in the Magnetism Workbook. Have them use it to download and print their achievement badges.
Class Assignment: Try answering the questions that students in England asked about the topic of Magnetism. Could you answer them all?
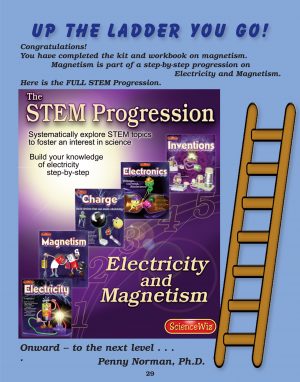
NOTE: Magnetism is part of a progression that covers a major topic area in the Physical Sciences: Electricity and Magnetism. A basic understanding of this topic is essential to functioning in modern society as it extends into and impacts practically all aspects of our lives.